Hero of Caledonia awarded

Hero of Caledonia citation for Lieutenant Lewis T. Arnold (posthumous)

For exemplary bravery and combat efficiency in holding off an enemy assault on a key position.

Untitled

A two gun detachment of the Light Anti-Tank Battery, 16th Infantry Battalion under the command of Lieutenant Lewis T. Arnold was ordered to take up a defensive outpost on the edge of a field of tall crops to the right of the battalion’s vanguard position. The 16th Battalion was guarding the southern flank of the 1st Caledonian Mechanised Division’s advance as part of Operation Market Garden.

On the morning of 20 September 1944 a superior German force attacked the Battalion vanguard position, attempting to turn the flank of 1CMD’s advance. At this point the detachment of two 6pdr guns was the only unit in position holding a key objective on the right flank. Although in a precarious position, the unit was well supplied with armour-piercing and anti-tank ammunition. As the first German infantry broke cover from the wood line opposite the Caledonian position, Lt. Arnold ordered a rapid fire into the advancing enemy.

Lt. Arnold directed an accurate fusillade that drove off two attempted assaults by two full platoons of enemy infantry. Despite being under intense German fire, including artillery fire, Lt. Arnold remained calm and efficient in controlling his detachment, moving between the guns helping identify targets, boosting the morale of his men and assisting where casualties had reduced the strength of the gun crews. In this he was ably assisted in particular by Bombardier Colin Cunningham, who controlled one of the 6pdr guns and has received the Medal of Gallantry for his actions on this occasion.

During the second assault, the German infantry were supported by four Sturmgeschutz armoured vehicles. Lt. Arnold, assisting on Bdr. Cunningham’s gun, helped destroy one Sturmgeschutz and damage another. Lt. Arnold was killed in an assault by the remaining enemy armoured vehicles but the losses he and his unit inflicted had clearly broken the strength of the enemy. The enemy retreated when a number of Caledonian Sherman tanks appeared on the scene. Bdr. Cunningham was then able to capture the damaged and abandoned enemy armoured vehicle and took charge to reorganise the anti-tank detachment.

Posted in Uncategorized | Leave a comment

A Tearless Battle

In-game date:                        22 September 1944

In-game location:                 The flanks of XXX Corps’ drive to Arnhem – somewhere near the town of Cotaer.

Opponent:                             A.R.

Battle Type:                           Free-for-all, Germans attacking on the first turn

Result:                                   Allies 6, Germans 1

 Allied Forces

Delta Company,16th Infantry Battalion – Confident Trained. 1,000 pts

  • HQ: Major Coat, 2IC Captain Karlson with bagpiper Sgt Preston, Sniper Cpl Jennings
  • Rifle Pl: Cmd Rifle/MG, PIAT, Light Mortar, 4xRifle/MG
  • Rifle Pl: Cmd Rifle/MG, PIAT, Light Mortar, 4xRifle/MG
  • AT Pl: Cmd Rifle, 2x6pdr AT Guns
  • AT Pl: Cmd Rifle 2x17pdr AT Guns
  • Field Artillery Bty: 2xCmd Rifle, Staff Team, Observer with OP Carrier, 4x25pdr Guns
  • Tank Pl (6 Tank Bn): 3xSherman V and Sherman Firefly – Confident Veteran

 German Forces

Grenadier Company – Confident Veteran. 1,000 pts

  • HQ: 2xCmd SMG with PzFaust, Sniper, 2xMotorcycle Combinations
  • Grenadier Pl (Rot): Cmd SMG w/PzFaust, 6xMG teams
  • Grenadier Pl (Blau): Cmd SMG w/PzFaust, 6xMG teams
  • HMG Pl: Cmd SMG, 4xMG42 HMG
  • AT Pl: Cmd SMG, 3xPak.40 7.5cm AT Guns
  • Artillery Bty: Cmd Rifle, Staff Team, 2xObserver Rifle, 4×10.5cm Guns

 Allied Casualties

  • Nil

 German Casualties

  • HQ: Destroyed, 2IC SMG fled, Sniper ‘eliminated’
  • Grenadier Pl (Rot): 4xMG Teams KIA, remainder captured or fled
  • Grenadier Pl (Blau): Destroyed, Cmd SMG and 2 MG Teams fled
  • AT Pl: Destroyed. Cmd SMG fled

Foreword

Neither I nor A.R. had played Flames of War in a long while and A.R. had just moved house to a new (and better) place so we thought it was time to break the fast with an easy friendly game. How much had we forgotten? Only time would tell…

Introduction

The 1st Caledonian Mechanised Division had deployed V Brigade and supporting units to fight alongside XXX Corps’ drive north toward the ultimate goal of Arnhem. Delta Company of 16th Battalion was actually a Reserve volunteer formation newly arrived to the war. ‘Coat’s Company’ was rushed in to help stop a localised German attack that was developing on the XXX Corps southern flank.

 After Action Report

Deployment

‘Coat’s Company’ deployed its two Rifle Platoons, one on each of the two widely separated hills overlooking the east side of the town. The platoon on the Caledonian left flank guarded the battery of 25pds field artillery. The platoon on the right flank was deployed alongside a pair of supporting 6pdr AT guns and the Company HQ. On the far right and closely tied-in with the Rifle Platoon was a Sherman unit. The 17pdrs, which had been dragged along with the lead company in the expectation of a panzer assault, deployed astride the central east-west road – hoping for a glimpse of at least a motorised target, but ultimately doomed to serve no purpose whatsoever.

The Germans deployed in a broadly extended line. The two Grenadier platoons, formed the main attack force on the German left flank, with three PaK 40s and Company HQ rolling up behind. The 10.5cm artillery battery set up behind a hill with the HMG platoon to their front.

The German plan was to make an initial rush forward by the grenadiers and supporting AT guns, with protective fire from the artillery battery, then dig in at the centre point to resist any Allied attack. The Caledonian plan – set up strongly and just ‘wing it’ – respond appropriately to any moves the Germans make. Simple.

The Germans deploy ready to assault

The Germans deploy ready to assault.

The Battle Part 1

The German infantry rolled forward, almost emulating the human wave-type attacks their compatriots might have faced in the East. The German sharfschutze and the Caledonian sniper Cpl Jennings mirrored each-other’s actions and snuck up to the south to take shots at the opposition artillery, resulting in the batteries being pinned in the first turn. The German shooter had crept up very close indeed to the 25pdr battery. Taking advantage of this fact, the Caledonian left flank Rifle Platoon moved upon his position and rooted him out. In doing to they sacrificed the opportunity to dig in but this had not detrimental result. Meanwhile the German HMG teams began a searching fire, trying to locate and kill or flush out Cpl Jennings and his spotter.

 As the German infantry and AT guns came into view the Caledonian tanks, and eventually the 6pdrs and right flank Rifle Platoons opened up on their advancing opponents. Caledonian tanks manoeuvred into positions most advantageous to their marksmanship capabilities (Semi-Indirect Fire). Once the 25pdr Field Battery unpinned following its sniper surprise, it ranged its guns in on the enemy artillery and HMG teams. Although causing no serious casualties, their rounds, together with Cpl Jennings’ scoped .303, kept the German artillerymen panicked and confused for the entire battle. (The German artillery never unpinned and never loosed a shot throughout the entire battle!)

 Cpl Jennings neutralises the German artillerymen – keeping them pinned with well-placed shots

Cpl Jennings neutralises the German artillerymen – keeping them pinned with well-placed shots.

The Battle Part 2

As the Germans advanced to within a few hundred metres of the (now dug-in) Caledonian line they began to take serious casualties. The first to go were the PaK 40s – the Sherman Platoon eliminating its only major threat. Following this, the full weight of Caledonian firepower fell upon the Grenadiers as they tried to dig in. Zug Blau was reduced below half strength and then fled before an assault by Sherman tanks. Zug Rot also took major losses (although managed to remain in place a little while longer). The destruction of the German left opened the way for the Caledonian tanks to advance on the objective in the overgrown field on the western corner of the village.

The Sherman Platoon drives through the remnants of the Grenadiers

The Sherman Platoon drives through the remnants of the Grenadiers.

Shermans roll over the terrified German artillery observers as the late afternoon sun streams across the battlefield

Shermans roll over the terrified German artillery observers as the late afternoon sun streams across the battlefield.

Seeing the imminent danger to the overgrown field objective, the German Company Commander rushed to reach it. He reached it before the Shermans, but didn’t stand a chance against the eventuating tank assault. Upon the elimination of the German HQ and the Caledonian capture of the objective, the Germans recognised defeat and withdrew their remaining forces. The Wehrmacht would not be threatening the flanks of XXX Corps in this sector any time soon. ‘Coat’s Company’ had proven itself in battle, and without taking a single serious casualty to enemy fire. In the process it had destroyed three enemy AT guns, a pair of motorcycles, killed or seriously wounded around 60 enemy, captured around 20 and driven off the remainder.

The Shermans brush aside the German HQ to take the objective

The Shermans brush aside the German HQ to take the objective.

Posted in Uncategorized | Leave a comment

1st Caledonian Mechanised Division Tables of Organisation & Equipment (T/O&E) (as at June 1944)

 Divisional T/O&E

 1CMD TO&E ii

Note some units which have featured in previous posts have been numbered.

1CMD Tank Bn TO&E ii

This Tank Battalion T/O&E includes an inset of the Heavy Tank Company operating in Normandy in June 1944.

 1CMD Motorised Infantry Bn TO&E ii

Caledonian Motorised Infantry Battalions were plentifully equipped with M5 Half-tracks during the Normandy campaign.


1CMD Infantry Bn TO&E ii

Infantry Battalions included some organic fire support, anti-tank and reconnaissance units.

 1CMD Towed Artillery Bn TO&E ii

As in the British system, the towed artillery units usually operated with infantry units while the self-propelled units supported armoured attacks.

 1CMD SP Artillery Bn TO&E ii

Units of the SP Artillery Battalion sometimes provided direct fire support to the armoured units.

 1CMD Anti-Tank Bn TO&E ii

Caledonian anti-tank units were designed to be split off from the Divisional Anti-Tank Artillery Battalion and attach to other units to strengthen local anti-tank defences. In June 1944 the SP anti-tank/tank destroyer units were mostly equipped with Achilles 17pdr vehicles.


Posted in Uncategorized | Leave a comment

Battle Report: ‘A stop along the Le Bouquet road.’


In-game date:                       10 June 1944

In-game location:                 A tiny hamlet along the road to Saint-Jean-des-Baisants.

Op Overlord Username:     Peter28842

Opponent Username:         Paul R

Battle Type:                           Cauldron, Allies attacking

Result:                                   Allies 6, Germans 1


Allied Forces

Charlie Company, 6th Tank Battalion, ‘Siegel’s Squadron’ – Confident, Veteran. 1,500 pts

HQ: Major Logan Haven Siegel (Sherman V) with Captain Leslie Elijah Frye, 2IC (Sherman V)

7 Platoon: 2xSherman V, Firefly; Cmd Sherman has .50cal AA MG

8 Platoon: 2xSherman V, Firefly; Cmd Sherman has .50cal AA MG

9 Platoon: 2xSherman V, Firefly; Cmd Sherman has .50cal AA MG

Scout Platoon: 3 Recce Carriers, one with PIAT

Motor Rifle Platoon: Cmd MG, PIAT, Light Mortar, 3xMG Teams in 4xM5 Halftracks

SP Field Artillery Battery: 2xCmd Rifle, 1xStaff Team, 1xSherman OP, 4xSexton 25pdr; two Sextons have .50cal AA MGs.


German Forces

Panzer Company – Confident, Veteran. 1,500 pts

HQ: 2x StuG III

Tank Platoon: 3xPanzer IV

Schwere Panzer Platoon: one Tiger I

Assault Gun Platoon: 5xStuG III

Panzergrenadier Platoon: Cmd MG with Panzerfaust, 6xMG Teams with a staff car and trucks

Limited Air Support: Junkers Ju-87G ‘Stuka’


Allied Casualties

7 Platoon: one Sherman V destroyed

MotorRifle Platoon: Cmd MG Team, light mortar team, and one MG Team KIA

SP Field Artillery Battery: one Cmd Rifle Team KIA


German Casualties

HQ: 2xCommand StuG IIIs destroyed

Assault Gun Platoon:  3xStuG IIIs destroyed, two withdrew

Tank Platoon: 3xPanzer IV destroyed

Schwere Panzer Platoon: one Tiger I destroyed

Panzergrenadier Platoon: 5xMG Teams KIA

Sporadic Air Support: *Some Stukas driven off, possibly damaged or destroyed


Introduction

The 1st Caledonian Mechanised Division had accumulated an abundance of combat experience among its leaders and men by the time of the Normandy campaign, with many of its component battalions, and quite a large number of its individual soldiers, having served from the beginning of the war, from France and Norway in 1940, North Africa and the Middle East from 1941, and Sicily in 1943. The experience showed in a number of sub-units in particular, and Charlie Company, 6th Tank Battalion, was no exception. Led by the irrepressible and aggressive Major L. Haven Siegel and his offsider Les ‘Flank ‘em’ Frye, the unit had been in heavy action over the course of the Normandy campaign. Most of the unit’s men had been with the Company in Libya and Tunisia. The 6th Battalion had lost a quite a few of their number to enemy action since 6 June (together with a number of tanks) and the tankers of Charlie Company were out for vengeance. Coming upon a tiny and apparently lightly garrisoned hamlet along the way to Saint Jean des Baisants in the morning of 10 June, they would have their chance.


After Action Report

Deployment

The German Panzergrenadiers dug themselves in around and inside the main building in the hamlet, guarding the two objectives, one beside the north-south road and one on the eastern side of the main building. The StuG IIIs hid themselves in ambush positions around the smaller buildings and single low hill to the west – the direction from which the Allies would attack.


The tanks of 8 and 9 Platoons of Siegel’s Squadron lined up on the western end of the board, interspersed with the Sexton battery. They stuck close together to try to maximise the number of AA .50cals they could bring to bear in the event of a German air strike – a Stuka squadron had been operating in the area.

 1 Deployment


Caledonians rapidly gain the upper hand

As predicted, the German attack opened with a screaming Stuka attack which killed one of the artillery command teams but inflicted no other damage – the .50cal MG gunners having done their job. StuG IIIs moved out of ambush positions to fire a volley at the Shermans, but only managed to bail one, but the confident crew quickly remounted.

 3 Luftwaffe strike inflicts a casualty

A casualty from Stuka attack.

The return fire from the Shermans and Sextons was devastating, destroying three of the StuG IIIs. Then 7 Platoon, 6th Tank Battalion suddenly appeared on the eastern side of the village (having conducted a rapidly executed flanking manoeuvre) and knocked out the German command StuGs with rear shots. The two remaining German armoured vehicles decided (rolling a ‘1’) to crunch the reverse gears and get out of there, leaving the German infantry to the mercy of the Allies.

 2 The StuGs are eliminatedStuG IIIs are eliminated

 5 Schutzen hold their position German infantry hold their position


German reinforcements.

Fortune had rapidly turned to the favour of Charlie Company. Major Siegel would not let this opportunity slip – his command closed in for the kill like a pack of wolves. 8 Platoon, with the Command and 2IC’s tanks moved forward to machine-gun range of the German infantry, 7 Platoon moved forward to fire into the main building on the eastern side, leaving a Firefly concealed behind a bocage hedgerow to watch the southerly road. 9 Platoon took up overwatch positions among the smaller buildings to turn the southerly road and open area into a crossfire about to happen. A Motor Rifle Platoon doubled along the western road into the village, using the buildings as cover, and the infantrymen prepared to dismount for an assault.

 4 The Armour closes in, but a Tiger shows up Closing in on the objective

 6 Tiger scores a kill The Tiger scores a kill, and is lining up his next victim

Moments later, a Tiger I heavy tank rolled into view on the southern road, rushing toward the hamlet to relieve the trapped infantry. Its experienced commander, spotting a Sherman V of 7 Platoon, immediately turned the vehicle into a towering column of smoke and fire with a well-aimed 88 round. 7 Platoon’s Firefly returned fire to no effect. Seeing the moment, 9 Platoon darted out of cover to race around the Tiger’s left flank. The 75mm round of one vehicle bounced harmlessly off the Tiger’s armour, but a perfectly placed 17pdr shot detonated the Tiger’s ammunition, throwing the turret clear of the hull!

 7 And is killed by a 17pdr in the flank The Tiger is dispatched by the ace Firefly

(With Paul’s unlucky Tiger I suffering yet another inglorious destruction only moments after its battlefield appearance, the game would have been up for the Germans (three platoons on, two destroyed, no Command), but we decided to play on).


More Panzers!

As .50 calibre M2 Brownings drove off another half-hearted Stuka attack, three Panzer IVs appeared on the south road. Their opening shots scored hits, but bounced off the (surprisingly effective) front armour of the Sherman Vs of 9 Platoon. Lining the newcomers up, the veterans of 9 Platoon poured out shots. Ace gunnery from the 9 Platoon Firefly destroyed two of the Panzer IVs and the remainder also destroyed in the crossfire of the 9 Platoon Sherman Vs and 7 Platoon vehicles.

 8 The Last German reinforcements arrive Sherman support for the final assault

 9 And are dealt with, again by ace gunnery from the Firefly 

The ace Firefly, with other Shermans in support, destroy the Panzer IVs

The Sexton battery and 8 Platoon with Siegel and Frye hammered the Panzergrenadiers while the Motor Rifle infantry moved into assault positions. Terrifying close-range MG42 defensive fire killed three teams of the Motor Rifle Platoon but they succeeded in pushed the Germans off the objective in the middle of the hamlet, assaulting the former position of a German team killed by Sherman fire.


The last ditch effort

The last three surviving Panzergrenadier teams, including the Commander with a Panzerfaust, gathered together in the ruins of the main building and prepared themselves psychologically as a line of five Sherman tanks idled menacingly only metres outside. With a terrific ‘huraah!’ they launched themselves toward the Caledonian tanks. They were close enough that the tanks’ hull machine guns did not have the chance to bring down fire on them, although a Bren gunner from the Motor Rifle Platoon cut down one of the yelling MG Teams as they ran out of the doors of the main building.

 10 The German infantry are pushed off the objective Germans are pushed off the position

Despite their ardour, the Panzergrenadiers were unable to score any hits (Paul seems to have rolled mostly ‘1’s and ‘2’s the whole game). Although the Caledonian tanks and infantry were likewise unable to harm the Panzergrenadiers in the counterattack, the once-heroic Panzergrenadiers, having expended their last reservoir of motivation, threw in the towel.

 11 The Germans fight to the last The Panzergrenadiers launch an heroic final charge

Conclusion


Siegel watched from his hatch as the few surviving Germans, hands raised and eyes downcast, marched past his tank. Nothing boosts morale like a stunning victory, he thought, and to have won it with so few casualties, at least to his veteran tank crewmen, was almost providential. He couldn’t help the feeling that dumb luck had played its role, although luck without the skill to use it would not have carried him this far. A trio of Bren carriers clanked up alongside his tank. ‘Did we miss anything Sir?’ shouted the Bren carrier platoon commander, a grin across his face. Siegel did not return the grin – he was a man of stony and humourless disposition. He exhaled heavily through his teeth as he prepared some sort of reply. ‘No. Just a game, Sir, just the game’ he shouted down. ‘Oh, no worries Sir, we’ll be off then.’ The carrier commander called, still jovial and evidently oblivious to the meaning of Siegel’s statement. As the trio of carriers lurched away, Siegel turned his view toward the south where here would be harder fighting to come…

Posted on by peter28842 | Leave a comment

Battle Report: ‘The Defence of Saint-Gabriel’

In-game date:                         10 June 1944

In-game location:                 A few kilometres West of Creully

Op Overlord Username:     Peter28842

Opponent Username:          Andrew R

Battle Type:                              Cauldron, Germans attacking

Result:                                       Draw – Allies 3, Germans 3


Allied Forces

Able Company, 21st Motorised Rifle Battalion (represented by Kompania Piechoty from Polish 1st Armoured Division) – Fearless Trained: 1,500 pts

HQ: Captain Ellis Sunday (Cmd Rifle), Lieutenant James Bishop (2IC Rifle)

1 Platoon: Cmd Rifle, PIAT, 2” Mortar, 6xRifle/MG Teams

2 Platoon: Cmd Rifle, PIAT, 2” Mortar, 6xRifle/MG Teams

Mortar Platoon: Cmd Rifle, PIAT, 4×3” Mortars

Anti-Tank Platoon: Cmd Rifle, 2x6pdr AT guns

Machine-gun Platoon: Cmd Rifle, PIAT, 4xVickers HMG

Transport Platoon: 4x 3 Ton CMP trucks

3 Platoon, 6th Armoured Bn: 3xSherman V, Sherman Firefly

4 Platoon 6th Armoured Bn: 3xSherman V, Sherman Firefly

Limited Air Support: Hawker Typhoons of the Caledonian Air Force.


German Forces

Panzer Company – Confident Veteran – 1,500 pts

HQ: 2x StuG III

Panzer Platoon: 3xPanzer IV

Schwere Panzer Platoon: one Tiger I

Assault Gun Platoon: 5xStuG III

Panzergrenadier Platoon: Cmd MG with Panzerfaust, 6xMG Teams with a staff car and trucks

Limited Air Support: Junkers Ju-87G ‘Stuka’


Allied Casualties

1 Platoon: 3xRifle/MG Teams KIA

2 Platoon: 1xCmd Rifle KIA, 3xRifle/MG Teams KIA

Mortar Platoon: PIAT Team, 3” Mortar Team KIA

3 Platoon, 6th Armoured Bn: Destroyed

4 Platoon 6th Armoured Bn: Destroyed


German Casualties

HQ: Command StuG III fled

Assault Gun Platoon: 3xStuG IIIs destroyed, 1xbailed, 1x fled

Panzer Platoon: Panzer IV destroyed

Schwere Panzer Platoon: Tiger I destroyed


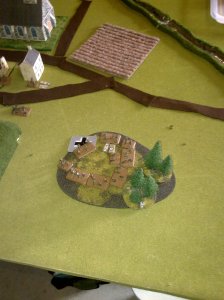
As the armoured striking power of the 1st Caledonian Mechanised Division continued its drive south and west, attempting to outflank the town of Bayeux, the Infantry Battalions of VI Infantry Brigade followed in their wake, holding a series of defensive positions at key points guarding the flanks, each Battalion ‘leapfrogging’ each other along the line to keep up as the armoured spearhead advanced. One such key point, on the western flank, was at the small town of Saint-Gabriel – a village, like so many, surrounded by bocage fields and dominated by a church. Occupying a salient projecting into German-held territory, was Able Company of the 21st Infantry Battalion – considered by some as a second rate unit, the 21st had nevertheless been in action at a number of points along the advance into the Norman hinterland following the D-Day landings, and had lost its commander, Major Garrett Willis on 8 June. Major Willis was replaced by Captain Ellis Sunday – a dull and unremarkable, but undoubtedly dedicated officer, who was about to fight a fairly unremarkable, but nevertheless tragic action.


After Action Report

Deployment

Captain Sunday’s force arrived on the night of 9 June and by morning had established fairly strong positions guarding the key terrain (objectives): the eastern periphery of the village on one side, and a thick stand of trees that marked the border of the western side. 1 Platoon took up a choice position among the houses on the eastern side, and 2 Platoon dug in among the trees to guard the western objective. Captain Sunday set up office in the centre of the town, and made sure his two 6pdr guns were dug in in concealed ambush positions along the verges of the east-west road running down the centre of the town. These guns, it was felt, would ensure any German armoured assault would face stiff resistance.

 B 1 Platoon and the 6pdrs positioned in the village 
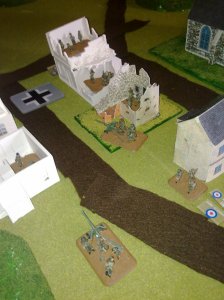
1 Platoon and the 6pdrs positioned in the village.

A 2 Platoon encamped in the woods to the west 2 Platoon encamped in the woods to the west.

Seeing Saint-Gabriel as a decisive point along the flank of the troublesome Caledonian Division, the German commander assembled as many armoured vehicles as he could: a large assault gun platoon, with support from a rare heavy Tiger I would lead the assault, and Panzer IVs and Panzergrenadiers would follow. The plan was simple – blast the Caledonian infantry from a distance, and then overwhelm the remnants.


A Tiger is doomed

It was mid-day by the time the German panzer assault commenced. The riflemen of the 21st first noticed something was afoot when they saw a pair of Typhoons scream down and loose off a volley of rockets at some unseen target over a nearby hill. They would find out later, what the vigilant pilots of the patrolling fighter-bomber squadron had spared them: for the rocket attack had destroyed a StuG III and a Tiger tank! (Paul R’s unfortunate Tiger hasn’t had much success – either not showing up for the battle at all, being taken out by a PIAT in close combat, a Sherman 75mm shot in the rear, and being driven off by Aussie infantry in assaults on two occasions).

  C Panzer battle line The Panzer battle line in the distance.

 D The Caledonian Air Force destroys the luckless Tiger! 

The Caledonian Air Force destroys the luckless Tiger!

The remaining German StuGs now lined up and advanced across a line of low hills toward the village from the south, hurling their shells at the buildings on the eastern edge. Grim-faced Caledonian riflemen clutched their helmets and held on amid the dust and falling rubble. The German StuG commander had evidently radioed in the position of his enemy, as a Stuka dive-bomber swooped in to drop a 500kg bomb on a building in which a section was sheltering – killing a Rifle/MG Team. Evidently the Allies didn’t have total air superiority in this sector.


The rest of the Germans arrive

As the StuGs continued their bombardment of Saint-Gabriel, three Panzer IVs rolled in to take up position alongside them. Together, the two platoons pounded the once lovely facades of the French houses into shell-marked and blasted remnants. Another two Rifle/MG teams were destroyed. The German vehicles were at close range now, and a few brave men rushed between the buildings to help their wounded comrades. 1 Platoon continued to hold, awaiting what seemed like the inevitable assault. The crews of the 6pdr AT guns, lying low in the drainage ditches either side of the central street watched the helplessness of the infantryman in the buildings to their front and opened up on the Panzer IVs. Their shells had no effect and they had given away their position. Captain Sunday couldn’t blame the AT crewmen for wanting to help their comrades, even though he’d wanted them to stay quiet until the Panzers were up close. He gave no orders, but went about among the men, saying quietly to each one – ‘hold on, hold on.’


An Observer spotted a line of German Kfz trucks racing around the hills to the north-east. A choice target, he tried frantically to raise an Air Force Forward Observer or liaison team on the radio, but to no avail!  The Observer pounded the ground in frustration as the golden target slipped away and out of sight. The German trucks delivered their Panzergrenadiers and quickly drove off. As the German’s began siting their MG42s on the hillside overlooking the town, Captain Sunday gave one of his only orders of the entire battle – as the entire German force was now in position on the eastern side of the village, he brought 2 Platoon in to take up a position on the north-western hill opposite the Germans – they would guard the flank of 1 Platoon.

 E Panzers close in on Saint-Gabriel Panzers close in on Saint-Gabriel.

F Yet more Germans arrive as the Servo-skull (background right) watches, recording everything 

Yet more Germans arrive. 2 Platoon changes position.

G Stuka bombs 2 Platoon, now in the open A Stuka bombs 2 Platoon, who are now caught in the open.

Things looked grim for 21st Battalion. Radio calls had been sent out, but nobody seemed to be listening. Suddenly, it seemed as if the cavalry had arrived – a column of Shermans from 6th Armoured Battalion had at that moment been moving in convoy with some support troops from the 21st Motor Battalion along the road behind Saint-Gabriel on the way to the front. Heeding the call, a platoon that including a Firefly moved in behind the German ‘panzer line’ and began losing off shots. Two StuG IIIs exploded in columns of smoke and another was penetrated. Startled, the remaining StuG drivers put their feet to the floor and sped off, with their distraught Company Commander in pursuit, desperately trying to rally them. The German 2IC now took control. Turning his attention from the village to the oncoming Shermans, he led the Panzer IVs southward.

  H Shermans surprise the StuGs 3 Platoon Shermans surprise the StuG IIIs!

Stuka and Panzer attack

Another Stuka swooped down and destroyed a Sherman, and while the Sherman 3 Platoon commander stared in horror, the Panzer IVs and Command StuG turned his and another Sherman V into flaming wrecks. Only the Firefly held on fearlessly, destroying a Panzer IV before it was knocked out. The second Sherman platoon in column, 4 Platoon, then arrived.

 I Platoon commander looks on, horrified as one of his Shermans is destroyed by a bomb The 3 Platoon commander looks on, horrified, as the turret of one of his Shermans is lifted clear into the air from an explosion of a Stuka bomb.

2 Platoon, now dug in on the north-west heights near the town, were suffering. The Luftwaffe had control of the air over this battlefield, and a number of Stuka attacks went in, killing some riflemen, although most bombs fell astray. The Panzergrenadiers held back from the village and hammered away, pouring their incredible firepower into 2 Platoon. 2 Platoon, their Bren guns totally outmatched by German MG42s, lost more Rifle/MG teams and their Platoon command team. They stoically held on however – for their mates in the village below.


The Shermans of 4 Platoon opened fire on the Panzers but their targetry was hideously poor. Outshot by the veteran Panzer IV crews, and outmanoeuvred, they were destroyed just as Mortar and Vickers HMG teams marched up to their rear, hoping to reinforce their comrades in the village. To their horror they had marched straight into a German tank assault! A 3”mortar team and a (critically) the PIAT team were gunned down immediately. The Vickers platoon, furthest from the Germans ran into the cover of the woods by the roadside, while the Mortar crews, determined to make a stand, set down their tubes and lobbed a number of hopeful shots at the Panzers. An incredibly luck shot exploded next to a German tank commander, causing the jumpy and panicked crew to bail out. The mortar platoon stood beside their weapons and readied more rounds – they were doomed, they knew, but they would fight to the death to allow the Vickers platoon to escape!

 K The aftermath. Sherman hulks visible near the low hills to the south The Panzers had won the tank battle, but the village had remained in Allied hands.

By this stage the sun was setting and both sides, severely battered, knew they could not continue the fight.  The remaining Panzers and StuG III moved back, using the growing darkness to conceal them from Allied air attack. The astonished mortar men and Vickers machine-gunners felt as if they had been pardoned on the gallows! Relieved, they made their way quietly back toward their own lines in the opposite direction from the Panzers.


The Germans had not taken Saint-Gabriel, but their infantry had taken possession of the north-eastern heights overlooking the town. As darkness fell, the survivors of the beleaguered 21st Infantry Battalion moved around in the now quiet town, counting the dead, evacuating the wounded, re-establishing shelled positions. Captain Sunday looked at the dust-smeared faces of his men with a blank and sad expression. The men’s courage had held, but he felt he had let them down somehow. He said nothing, as was his way. There was nothing to be said.

Posted in Uncategorized | 4 Comments

In-game date:                          7 June 1944

In-game location:                 A few km inland of the Juno beachhead, past Creully

Op Overlord Username:    Peter28842

Opponent Username:          Paul R

Battle Type:                              Cauldron, Allies attacking

Result:                                       Allies 6, Germans 1


Allied Forces

Rockwell’s Recce Column (represented by Canadian Armoured Recce Squadron) – Confident, Trained

HQ: Major John Rockwell (Sherman V) with Lieutenant George Tibbins, (acting) 2IC (Sherman V)

3 Platoon: 4xSherman V

6 Platoon: 4xSherman V

Carrier Recce Platoon: 3 Recce Carriers, one with .50cal MG

Motorised Rifle Platoon: Cmd Rifle/MG, PIAT, Light Mortar, 6xRifle/MG Teams in 2xCMP 3 ton trucks

Motorised Pioneer Platoon: Cmd Pioneer Rifle, 3xPioneer Rifle Teams in one M5 halftrack and two Jeeps

AT Platoon (SP): 4xM10C

Priority Air Support: Hawker Typhoons of the Caledonian Air Force.


German Forces (estimated strength)

Panzergrenadier Company – Confident, Veteran

HQ: 2x StuG III

Tank Platoon: 3xPanzer IV

Schwere Panzer Platoon: one Tiger I

Assault Gun Platoon: 5xStuG III

Panzergrenadier Platoon: Cmd MG with Panzerfaust, 6-8xMG Teams with a staff car and trucks

Limited Air Support: Junkers Ju-87G ‘Stuka’


Allied Casualties

3 Platoon: one Sherman V destroyed

6 Platoon: one Sherman V destroyed

Motorised Rifle Platoon: one light mortar team and one Rifle/MG Team killed

Priority Air Support: *Assorted fighters and fighter bombers shot down


German Casualties

HQ: 2xCommand StuG IIIs destroyed

Assault Gun Platoon:  2xStuG IIIs destroyed, 2xbailed and captured, one withdrew

Sporadic Air Support: *Assorted fighters and attack aircraft shot down


After Action Report

Deployment

Moving further inland from the beachheads, Rockwell’s Reconnaissance column happens upon yet another enemy position. As they approach to within two kilometres, the leading tanks (6 Platoon) halt and begin calling in. They report a German infantry platoon is strongly dug in in a circular defensive position just to the north of a small village called Coulombs. The German troops are guarding a crossroads that Rockwell assesses will no doubt be an important junction for the Caledonian, Canadian and British main force units following behind. It also appears there are at least two assault guns hiding behind buildings in the village centre. Rockwell quickly orders 3 Platoon (Shermans) under the 2IC Lieutenant Tibbins (acting in the place of Captain Vance who was killed in an earlier engagement) to flank the village to the north, utilising the cover of crops and dead ground, while he takes 6 Platoon through some thickets to the take the village from the south.


Hearing reports of Allied tanks approaching from the south, the German Company commander in one of two HQ StuGs concealed among the buildings of the village, gives permission to his platoon of five StuG IIIs, concealed on a heavily treed hill west of the village, to open fire. He tries to raise his reserve platoons on the radio but the transmission is broken and barely readable. At least they know something is up!


Opening shots

The five hidden StuGs duelled with an equal number of Sherman Vs of 6 Platoon (with the Company commander) to the south of village, killing one and bailing another, while 3 Platoon, concealed by a wheat field, traded a few long range shots with the command StuGs to no effect. The Panzergrenadier Platoon, secure in its position, waited out.


The attack goes in

While the Shermans and StuGs on the south flank duked it out at varying ranges, the advantage swung to the Allies as a platoon of M10Cs arrived among a copse of trees, and the trucks, jeeps and ‘track caring the motorised infantry and pioneers appeared on the north-south road. While the Shermans kept the StuGs occupied, the trucks raced down the road toward the southern objective and screeched to a halt in front of the church and the M10Cs crept into firing positions.


A small air combat raged above the ground action – a few roaming Luftwaffe fighters and fighter-bombers duelled with a superior number of Caledonian aircraft. Neither side could bring its attack aircraft successfully to bear at this point. Only a quick strafing run by a lucky Typhoon gave grief to any ground troops.


The arrival of a platoon of M10Cs gave 6 Platoon the edge it needed: despite an M10C bogging down, the Shermans, GMC 17 pounders and Typhoon between them managed to knock out two StuGs, bail another two, and force the platoon to flee, leaving the southern (church) objective undefended! Taking advantage of this situation, the Shermans of both flanking units doubled it toward the village – 6 Platoon making for the forested hill west of the church which had formerly been occupied by the StuGs, and Lieutenant Tibbins with 3 Platoon swept down behind the more northerly treed hills, narrowly dodging several 7.5cm shells.


Taking the southern end of the crossroads

The Motorised Rifle Platoon piled into the church (except a security element of one team and the Light mortar (who opted to stay outside in the hope of lobbing a few bombs at the dug in Panzergrenadier Platoon), and the Pioneers disembarked and walked up to take the southern objective.


At this point, a Ju-87G Stuka broke through the wall of CAF fighter opposition to drop a single sacrilegious bomb at the Motorised Rifle Platoon in the church. The ensuing explosion carried away part of the mediaeval architecture of the building but left it intact. As the Platoon commander checked on his dust-covered men, however, he discovered the security element and mortar team, standing in the open, had borne the full force of the explosion and falling masonry! The Pioneers reached the objective and prepared to dig in. To the consternation of the German commander, his panzer reserve still had not shown up and the situation was now critical.


Lt Tibbins manoeuvred ordered his Shermans to split into two groups – one would climb the small tree-covered hill to put fire and observation on to the enemy command StuGs, while the other drove out onto the east-west road and take the StuGs from a different angle. In the ensuring fire fight, the German command StuG knocked out one of the 3 Platoon Shermans and then was itself destroyed by close range fire. The second command StuG fell soon after – to flank shots fired at long range by a pair of M10Cs that had moved around next to a wheat field south of the village.


Help arrives, but too late!

The German situation was dire – Allied tanks had completely cut off the Panzergrenadier Platoon, which alone remained resolute, dug in and holding the objective at the northern end of the crossroads. Allied infantry was ensconced in strong positions in the church and around the southern objective, and a group of Bren Carriers were sighted among the stands of wheat to the north. The skies were empty – the Luftwaffe and CAF having exhausted themselves. At last three Panzer IVs appeared in the distance, rolling down the east-west road toward the village. Help had finally arrived, but too late! Even if they doubled, the Panzer platoon commander reasoned, they could not retake the objective before the village was completely overrun. With their lone Tiger I nowhere in sight or sound, the Panzer commander elected to turn his tanks around and quit the field, leaving Coulombs and its Panzergrenadier garrison their fates.

The German HQ and defensive position on the northern objective.

The German HQ and defensive position on the northern objective.

6 Platoon with the Commander and the 17pdr GMCs (represented by Fireflies) duel with the StuG IIIs.

6 Platoon with the Commander and the 17pdr GMCs (represented by Fireflies) duel with the StuG IIIs.

The Motorised infantry elements’ vehicles screech to a halt in front of the church.

The Motorised infantry elements’ vehicles screech to a halt in front of the church.

3 Platoon rushes around the treed hills to the north to outflank the village.

3 Platoon rushes around the treed hills to the north to outflank the village.

 The German command StuG knocks out a Sherman before being dispatched itself.

The German command StuG knocks out a Sherman before being dispatched itself.

The lone Luftwaffe attack plane bears down on the village to target the church.

The lone Luftwaffe attack plane bears down on the village to target the church.

The belated Panzer IV platoon advances toward Coulombs.

The belated Panzer IV platoon advances toward Coulombs.

Maj. Rockwell looks on as the Pioneers take control of the objective.

Maj. Rockwell looks on as the Pioneers take control of the objective.


Posted on by peter28842 | 1 Comment

napoleon-riding-the-tank-of-history1.png

Posted in Uncategorized | Leave a comment

Cracking the Second Line

In-game date:                        6 June 1944

In-game location:                 A few km inland of the Juno beachhead toward Creully

Op Overlord Username:    Peter28842

Opponent Username:         Phil B

Battle Type:                           Cauldron, Allies attacking

Result:                                   Allies 4, Germans 3

Allied Forces:

Rockwell’s Recce Column (represented by Canadian Armoured Recce Squadron)

HQ:  Major John Rockwell (Sherman V) with Captain Julian Vance 2IC (Sherman V)

4 Pl: 4 Sherman V

6 Pl: 4 Sherman V

Carrier Recce Pl: 3 Recce Carriers, two with .50cal MG and one with PIAT

Motorised Rifle Pl: Cmd Rifle/MG, PIAT, Light Mortar, 6xRifle/MG Teams with 2 CMP 3 ton trucks

Motorised Pioneer Platoon: Cmd Pioneer Rifle, 3xPioneer Rifle Teams

AT Pl (SP): 4xM10C

Priority Air Support: Hawker Typhoons of the Caledonian Air Force.


German Forces:

Bodenständig Grenadierkompanie (343)

(Estimated strength)

HQ: Cmd SMG with Panzerfaust, 2IC SMG Team, Panzershreck Team

(western) MG Pl: Cmd SMG, 6xMG Teams

(eastern) MG Pl: Cmd SMG, 6xMG Teams

Sturmartillerie Pl: 3xStuG IIIs

Luftwaffe Flak Bty: Cmd Rifle, 2×8.8cm Flak

Fortifications and bunkers: 1×8.8cm Pillbox, 2xHMG Pillboxes, 2xHMG bunkers, some wire and minefields.

Allied Casualties

HQ: Maj. Rockwell’s Sherman V (quit the field), Capt. Vance KIA (Sherman V destroyed)

4 Pl: lost all its tanks destroyed or captured

6 Pl: one Sherman V damaged, remainder fled.

Motorised Rifle Pl: 3-4 infantry units lost


German Casualties

HQ: Cmd and 2IC KIA

MG Pl: most KIA, remainder captured

MG Pl: several teams KIA

Sturmartillerie Pl: 3xStuG IIIs destroyed

Luftwaffe Flak Bty: 2×8.8cm Flak destroyed, Cmd Rifle Team fled


After Action Report

Deployment

Allied forces have gained a foothold at Juno Beach and are moving further inland – in their path is a second line of German defences. As the Allies strike toward Creully, the tip of the spear is a reconnaissance detachment of the 1st Caledonian Mechanised Division – composed at this time by elements of the 2nd (Motorised) Infantry Battalion and the 4th Tank Battalion (the Glen Fruin Regiment) under Major. Rockwell. Scouting ahead of the main force, Rockwell’s unit comes upon what appears to be three German bunkers dug into the tree line of a large wood behind a church. The hill around the church has been also heavily fortified with wire obstacles and trenches, and freshly turned earth betrays the existence of a belt of mines planted right up to (and possibly into) the graveyard to the west of the church. Further scouting shows a German company strength infantry unit, and a formidable 8.8cm Kwk 43 installation in the centre bunker, but also reveals that this bunker complex is a relatively isolated salient. The bunkers cover the open ground around the church, but have a significant blind spot on heavily forested eastern flank, which presenting a golden opportunity for the Caledonian Recce units to approach unobserved. Without pausing to wait for reinforcements or specialist equipment, Rockwell orders his column through the woods, coordinating nearby Typhoon fighter-bombers of the Caledonian Air Force to buzz the German positions and cover the noise of his approaching Shermans. The keys to the position, he has identified, are the corners of the eastern and western trench lines before the bunkers.

 1 The German fortifications  The German fortifications

Turn 1

Getting to within a few hundred metres of the German positions still undetected, Rockwell and the lead Shermans of 4 Platoon suddenly come upon an unexpected site – a pair of Flak 88s.  The deadly guns open up – but all shots miss!  Perhaps the crews were distracted by the swooping Typhoons? In return the Shermans destroy one of the 88s. 2 4 Platoon Shermans come upon the 88s in the woods 4 Platoon Shermans come upon the 88s in the woods

6 Platoon Shermans come in from the North, swinging around the eastern edge of the German wire to fire at the remaining 88 but without success. One of the Shermans is bogged. A Recon Carrier Platoon struggles through the fallen logs and dense underbrush of the forest, following behind the Shermans of 6 Platoon. After inflicting such a terrific noise on the German position, the Typhoons, directed with impeccable timing by Rockwell’s FAC, finally swing down to launch rockets at the German infantry platoon dug in to the West of the church, killing one team and pinning them down.

6 German infantry keep their heads down as Typhoons pound their position German infantry keep their heads down as Typhoons pound their position

3 The plastic Battlefront Shermans of 6 Platoon approach the Germans The plastic Battlefront Shermans of 6 Platoon approach the Germans

After having abandoned their trucks on the edge of the forest, the Motorised Rifle Platoon runs onto the table toward where the lead Shermans have made contact with the enemy.

 4 Rockwell's coy converges on the German right flank Rockwell’s coy converges on the German right flank

Turn 2

As a ‘cab rank’ of fighter bombers continue to attack and pin the Germans’ western platoon, and the Motorised Rifle Platoon crashes its way through brush and ferns toward the action, the Shermans exchange fire with the remaining 88. The gunner, still confused and panicked by the sudden armoured assault through the trees, can’t get a bead on his targets, but the Shermans and Carriers can, and destroy their target. The Shermans now direct their attention to the entrenched German infantry platoon closest to them, and rake their lines with fire.  The surviving Luftwaffe commander, despondent at the loss of his precious 88s, flees as 4 Platoon Shermans continue their rush toward his position. Two of the Shermans, including Rockwell’s, bog down in the woods, but two others are able to assault the German infantry, killing one and pushing them out of their position. Their commander’s tank nowhere in sight, the Sherman platoon grinds to a halt on astride the now abandoned German trenches.

Deep in the woods behind the Caledonian infantry, a Motorised Pioneer Rifle Platoon sans vehicles, makes its way toward the action.

 5 The view from the German centre The view from the German centre

Turn 3

The German infantry west of the church, fearful of sighting another Typhoon, keep their heads down, but the other platoon – recently evicted from its entrenched position – resolves to assault the two Shermans as they wait for orders. With their powerful anti-tank weapons, they succeed in shocking the Caledonian tank crews into ignominious surrender.  The Germans also bag the two bogged down Shermans – thus eliminating 4 Platoon!

Three StuG III assault guns, no doubt having received a distress call on the radio from the bunker commander, roll toward the position along the tree line road from the North. Rockwell’s FAC excitedly reports the tempting target to the Air Force, but no planes are available at this time. His disappointment is only allayed by a report that the M10C platoon has arrived and is now heading in the direction of the StuGs through the woods, hoping for a shot from ambush.

 9 At last! Germans receive reinforcements - a roving StuG platoon At last! Germans receive reinforcements – a roving StuG platoon

Turn 4

The StuGs close in on the raging fight at the eastern flank trench line, scanning the woods for threats while the infantry platoon consolidates. The western platoon continues to cower in its trench and refuses to budge. Rockwell has now extracted his tank from its mire and resolves not to make the same mistake twice: this time the assault will be infantry led and coordinated with as much fire support as available. The Shermans and Carriers (with two .50 cal machine guns) hammer the entrenched German infantry, while the Caledonian Riflemen spring from behind trees and logs to assault, only to lose a few of their number and be forced back by a great weight of fire from MG42s. More Typhoons appear over the battlefield – the FAC informs them the StuGs are now too close to friendlies to present a target, so the aircraft hits their usual target again.

 7 Motorised infantry and pioneers assault! Motorised infantry and pioneers assault!

 8 The assault is beaten back, but the Caledonians regroup to try again The assault is beaten back, but the Caledonians regroup to try again.

Turn 5

A panzerfaust rocket streaks through the trees and clips the front shield of one of the Recon Carriers – narrowly missing the gunner’s head!  The Carrier crew jump out and wait for a safer moment. Other German fire bails a Sherman. Rockwell calls his Rifle platoon back for another go, promising plenty of suppression. The combined fire of five Shermans, three Recon Carriers with .50 cal machine guns, and the Caledonian Riflemen pours into the hapless German platoon in the eastern trench line, pinning them mercilessly and killing a few.  The Caledonian Riflemen charge into contact, losing another team to defensive fire. However the killing a number of Germans, including the bunker position commander, and forcing the survivors to flee. The good work of the light mortar men is noted at this point. The platoon now occupies the eastern trench line, but is now under clear observation from the German bunkers, and this worries the Platoon Commander. Three Shermans, including both Rockwell and his 2IC, roll up to the edge of the woods to try to provide cover, but some poor shooting only places smoke on the 8.8cm KwK 43 bunker. The Pioneer Platoon Commander realises he has made a serious error of judgement – he will not be able to roll up the enemy bunkers without exposing his platoon to suicidal risks in a frontal attack. Instead he orders his men to dig in to cover the Rifle Platoon’s left flank.

The StuGs move up next to the church to contest the objective of the eastern trench line corner and keep the company in the fight. Leaving two of their vehicles stuck on logs to the rear, the two remaining M10Cs creep up to the tree line and take a few shots at the German assault guns. One of the Caledonian loaders catches movement out of the corner of his eye – it looks like a German tank hunter team is running down the road toward them – ‘Sir, Sir,’ he yells at his boss, pointing, ‘we gonna have to watch out for them over there!’ ‘I know, not yet, bloody deal with the enemy armour!’ is the answer he receives.

 10 But M10Cs are waiting in ambush M10Cs waiting in ambush

Turn 6

The German infantry platoon on the western trench finally realises the predicament their company is in and starts running toward the sound of firing. Typhoons swoop in for one last run but inflict serious damage. No longer of use they turn back toward England. As the three Shermans that had come up to support the Rifle Platoon try to load additional smoke rounds, the StuGs and bunker 8.8cm open up an horrendous fire. Two Shermans explode in flames.  Rockwell’s vehicle alone narrowly escapes. Although this is the first casualty taken by 6 Platoon, the Sergeant, now in charge, makes a call – they are no longer combat effective and have to quit the fight – they still have two vehicles bogged and totally inoperable way back in the forest somewhere, and the crew of the third is still debating whether or not to get back in after having taken an AT rocket hit earlier. Major Rockwell shakes his head, and orders his driver to reverse back in to the woods – he’ll have to sort this bloody mess out personally. Rockwell’s Sherman leaves the battle.

Far away to the North a German machine gun platoon struggles its way toward the battle, but it’s too late – it will not get a chance to fight today.

As a rocket careers past their open turrets, the M10Cs turn their attention at last to the enemy tank hunter team as it rushes forwards. As the Panzerschreck crew readies another round however, the M10C drivers aggressively manoeuvre their vehicles, crushing their unfortunate opponents. Swivelling back into position, the M10Cs now deploy their 17 pdrs – taking out two of the three StuGs, including the Platoon Commander’s vehicle.  The commander of the remaining StuG glances over his shoulder through the rear periscope of the cupola. His face is a mask of determination in the dim light inside the vehicle as he realises it is now up to him – the course of the battle depends on him and his crew! As he turns around forwards again he takes a breath as he prepares to give voice to his resolve to fight on, to impart the seriousness of the situation to his crew, but … what is that?  Two helmets pop up above the parapet of the trench to his front, followed by a weapon as it is awkwardly hoisted to a shoulder. In one surreal moment, the StuG commander watches as the PIAT warhead is sprung from its projector and sails, almost slowly and visibly, toward him. There is an impact, an instant later a tremendous explosion. The German vehicle crew is no more. With the sounds of 7.5cm shells cooking off still echoing off the concrete bunker walls, the remaining men of this particular static infantry company make their way hastily through the forest toward the rear.

 Stopping only to submit a contact report and briefly examine the bunkers, Major Rockwell’s column remounts and rolls onward toward Creully.

1st Mech Div badge IV Brigade badge and motto.

Posted in Uncategorized | 2 Comments

Marine Landing Force Viking

MLF Viking unit badge

Marine Landing Force Viking (MLF Viking) was a combined arms assault force specifically established to make the assault on the Caledonian sector of Juno Beach (codenamed Mike White) on D-Day. It comprised Army, Navy and Air Force elements under one command and fought as a taskforce on the day of the invasion, being relieved on the frontline by follow up troops by the morning of 7 June. It was kept as a breaching force, advancing with the main columns to deal with any further fortified positions encountered inland.


Preparations

By mid-1944 the Caledonian Corps, Europe (CCE) had grown to the peak of its strength. The Caledonian Army component now comprised an entire Mechanised Division as well as a Parachute and Air Landing detachment which, it was envisaged, would support the Mechanised Division in relatively small-scale special operations as Allied forces fought their way through Western Europe. The Caledonian Air Force, which had long been based in Britain working in conjunction with the Royal Air Force and the US 8th Air Force, operated more than ten front-line squadrons. The Navy had also sent its sole light cruiser, as well as a number of destroyers, submarines and transports to ports in Britain in preparation for the coming invasion of the continent.

As the days drew closer to the scheduled invasion dates in May and June 1944, training activity of the Army’s units ramped up, and lessons were learned in exercises, particularly with the Canadian 3rd Division and 4th Armoured Division, and with the Polish 1st Armoured Division.  The specialised unit, named Marine Landing Force Viking was formed under the leadership of Brigadier Alexander Chisholm, incorporating Army, Air Force and Navy units in a single command. It was this force which was to make the opposed landing on Juno beach alongside the Canadians, and force its way inland. Air Force fighter, fighter-bomber and tactical bomber squadrons, the Navy transport group and the light cruiser CNS Darién were placed under Brigadier Chisholm’s Army command. The actual landing was to be carried out by a reinforced battalion-sized force built around the highly motivated and well-trained (but relatively inexperienced) 23rd Infantry Battalion with support from specialised vehicles of the 14th Independent Tank Squadron, and platoons from the elite 208 (Marine) Commando. 14th Independent Tank Squadron had conducted much of its training with the ‘funnies’ of the British 79th Armoured Division and operated many of the same unusual armoured vehicle designs.

Once MLF Viking had broken into the German defences, the plan called for the landing of reinforcements to expand the bridgehead, in the form of V Brigade of the 1st Caledonian Mechanised Division, and some elements of IV Brigade. Inland from the beachhead, the plan also included a landing by 99th Parachute Battalion to disrupt German communications and forestall the expected counterattacks. This pattern of using small-scale parachute drops and glider landings in close support of ground attacks was to be repeated several times in Caledonian operations in Western Europe.


Landings

The first wave of landings on D-Day went well, with LCIs and LCTs landing in position and on time, but later second, third and fourth waves struggled to negotiate the surf and beach obstacles. Baker Company of 23rd Battalion, together with a Breaching Group from 14th Independent Squadron and a Squadron of 208 Marine Commando (together codenamed MLF Viking II) lead the assault on the German defences.  Viking II broke through the well-sited German bunker system and met its codename Yew objectives despite taking around 70 casualties, among them the assault force commander Major Rhys Morgan, and losing several specialist vehicles and tanks. Viking I, III and IV (each battle group built around a Company from the 23rd Battalion) followed on, exploiting the success achieved by Viking II as the taskforce pushed on to objective line Elm.

An after action report by Captain Doug Leith (who took over command after Maj. Morgan was killed), highlighted the vital role of close air support by the fighter-bomber squadrons and in particular the remarkably accurate gunnery from CNS Darién in destroying a German counterattack which included tank support. The report also emphasised the need for a degree of speed in taking vital ground in assaults on fortified positions, and the acceptability of bypassing some bunkers and pillboxes in order to avoid becoming bogged down in the attack and suffering casualties in unnecessary frontal attacks.

The initially poor performance of 208 Marine Commando on the beach was also included in Capt. Leith’s report. The lead platoon took nearly 80% casualties taking a heavily defended pillbox, due in part to confusion and a breakdown of command resulting in fatal delays while the unit was under fire on the beach, and also due to several instances of commandos recklessly exposing themselves to enemy fire (apparently a response by soldiers acting on their own initiative after receiving ineffective direction from their platoon commander). This failure was a shock to a Caledonian Special Forces Training Command that had expected much better from its troops, and led to a range of improvements in the training of the commandos.

 D-Day and D+1

The four company battle groups of MLF Viking continued the hard fight to expand the beachhead throughout D-Day, and were relieved in the front-line by the follow-up troops from IV and V Brigades by the morning of 7 June.

Further history of MLF Viking has yet to be written but will certainly appear in future posts.


Posted in Uncategorized | Leave a comment

OP Overlord Battle Report: ‘Mike White – Juno Beach, 6 June 1944

Battle Report: ‘Mike White’


Report date 4 July 2013
Report location Canberra Games Society, Canberra, Australia
In-game date 6 June 1944
In-game location Juno Beach, (Mike White, west of Mike Green)
Op Overlord Username Peter28842
Nationality British
Your Army British Assault Company
Opponent’s Username SNE475
Opponent’s Nationality Germany
Opponent’s Army Festungskompanie (Normandy)
Victory Points Allies 5, Germans 2
Battle Report URL (insert blog URL here)
Battle Type Hit the Beach
Attacker Allies
Allied Forces


Baker Company, Marine Landing Force Viking  (represented by British Assault Coy)

HQ:  Command Rifle Team (Maj. Rhys Morgan), 2IC Rifle Team (Captain Doug Leith, with Piper Lachlan McLachlan)

No.1 Rifle Pl: Cmd Rifle, PIAT, Light Mortar, 4xRifle/MG Teams

No.2 Rifle Pl: Cmd Rifle, PIAT, Light Mortar, 4xRifle/MG Teams

Mortar Pl: Cmd Rifle, PIAT, 2xObservers, 4×3” Mortars

Armoured Platoon: 3xShermans

Breaching Group: Cmd Sherman, 2xSherman Crab, 4xChurchill AVRE, Bulldozer

Commando Pl: Cmd Rifle/MG, PIAT, Light Mortar, Flame Thrower, 3xRifle/MG Teams

Naval Gunfire Spt: The Light Cruiser Darién with Naval AOP

Limited Air Spt: Hawker Typhoons of the Caledonian Air Force.

German Forces Festung Company (represented by Festung Coy, Sword Beach)

HQ: Cmd SMG Team, 2IC SMG Team with Panzerfaust

Sword Wiederstandnest Pl: Cmd SMG, Bunker Section, Gun Section, MG Section, Anti-Tank Section.

352. Fusilier Pl: Cmd SMG, 6xMG Teams

Fusilier MG Pl: Cmd MG, 4x MG42 HMG Teams

21. Panzer Pl: 4xPanzer IV

Bunkers: 7.5cm Pillbox (AT 12),7.5cm Pillbox (AT10),5cm Pillbox

3xTobruk Pits

Fortifications: Extensive Barbed wire, minefields, and one AT obstacle, and entrenchments

Allied casualties Assault Company Commander: Major Rhys Morgan (KIA)

Commando Pl: (eliminated) Light Mortar, Flame Thrower, 3xRifle/MG Teams KIA; Pl Cmd and PIAT Team fled.

Mortar Pl: 1xObserver KIA

No.1 Rifle Pl: 1x Rifle/MG Team killed

Breaching Group: Cmd Sherman destroyed, 2xSherman Crab destroyed, 2xChurchill AVRE destroyed

German casualties Coy HQ: 2IC MG Team with Panzerfaust KIA

MG Pl: wiped out (Cmd and 4xMG Teams KIA)

MG Pl: 4xMG Teams KIA, remainder surrendered in final assault

Panzer Pl: 3xPanzer IV destroyed, 1xfled

Bunkers: 7.5cm (AT10) Pillbox destroyed, 1xTobruk Pit destroyed.


After Action Report

Deployment

The Germans had sited their 7.5cm pillboxes to provide crossfire along the landward side of the sea wall, with the ports protected by defilade walls from observation and fire coming from seaward. Wire entanglements and minefields ran the length of the sea wall and also divided the east (left) and west (right) flanks into sectors guarded by Tobruk pits (with observation onto the beach) and a 5cm pillbox hidden behind a building. The Wiederstandnest Platoon with the 2IC held the houses along the beach (including the Allied objective), while another with the Company Sector Commander waited in the crescent trench line in the hinterland to the south protecting the German objective.


Marine Landing Force Viking would bring ashore the vital Breaching Group in the centre opposite the beach exit, with 208 Marine Commando with Maj. Rhys Morgan, bold and youthful, to the right flank and No.1 Rifle Platoon with the 2IC Capt. Leith on the left.


The Landing (Fig.1)

With the German defenders still pinned after having taken casualties from the preliminary naval bombardment and close attention of the Caledonian Air Force, MLF Viking II hit the beach with all three platoons landing more or less where they were supposed to. Disaster hit on the right almost as soon as the ramps went down, as 28 year old Maj. Morgan was killed in a hail of fire from German MGs, the bulldozer bogging down and 208 Marine Commando milling about in confusion and taking casualties before reaching the sea wall. In the centre a Sherman Crab attempted to move up and clear the minefield across the beach exit but was destroyed by enfilade fire from ambushing German 7.5s. A Churchill dropped an assault bridge left of the exit and before long Churchill AVREs, No.1 Rifle Platoon in tow, began exiting the beach to attack the left 7.5 pillbox.

Maj. Rhys Morgan KIA 6Jun44 Major Rhys Morgan, commanding MLF Viking II on exercises in early 1944. A charismatic and clear-thinking leader, promoted to Company command at an exceptionally early age, his loss almost as soon as he stepped ashore on 6 June had a significant impact on the course of the battle on the right flank.

The Breaching Group Command Sherman was hit and destroyed by a 7.5 round, and Capt. Leith had to make the first of what would be several re-appointments of commanders in the Breaching Group. Meanwhile the German MG Platoon in the houses was wiped out by tank and light mortar fire and the MG Platoon in the crescent trench took more hits from fighter-bombers and the heavy guns of the Light Cruiser Darién. The landing craft began having difficulties with the tide and many turns passed before three Shermans turned up (a mortar platoon remained drifting out at sea for almost half the game), although German reinforcements, including a HMG platoon and four Panzer IVs also arrived.


The Breakthrough (Fig.2)

A team of Commandos threw their lives away in a forlorn attempted to assault the right 7.5cm pillbox, killed by heavy defensive MG fire from Tobruk pits. Another Commando with a flame thrower, his tank hit, detonated in a fireball in front the bunker. Eventually the exasperated Commando Captain managed to grenade the pillbox and moved his few remaining men into the cover of the buildings.


A team of Churchill AVREs battered away at the left 7.5 pillbox to no avail, and lost two of their number to point-blank AT fire. Their morale was plummeting fast. No.1 Platoon ignored the 7.5, rushed over the assault bridge, through the buildings, and wrested control of the Allied objective in the house from the German 2IC without loss. The Sherman platoon crossed the bridge and crashed through the (formerly rather nice) French houses toward the hinterland (and the German objective).


Deadly accurate naval gunfire took a heavy toll of the Panzer IVs, destroying two and bailing one before the tanks had a chance even to spot the enemy.


208 Commando attempted another bunker assault around the rear of the 5cm pillbox, but taking further losses, retired (in some disgrace) from the fight. More mission-specific training was in order for this unit.


With time running out, a decision was made – bypass the 7.5 bunker and head toward the German objective. The two remaining AVREs, three Shermans, and No.1 Rifle Platoon, under the direction of Capt. Leith, made for the German objective. A Sherman eliminated the last operational Panzer IV and the AVREs bombarded the entrenched Germans guarding the last objective in preparation for a combined tank-infantry assault.

Capt. Doug Leith, Juno Beach Captain Doug Leith pictured on the afternoon of D-Day, 6 June 1944. Taking command of MLF Viking II after the loss of Maj. Morgan, he ably led the assault company on to its objectives.

 It was turn ten. The last remaining German infantry, without any significant anti-tank weapons, outnumbered, outgunned, realised the game was up and conceded victory to the Allies. It had been a hard fight, with significant losses on both sides, but in the end, Allied numbers and firepower had broken through the prepared German defences. Mike White was open.


Fig.1, shows the position of German defences. A fighter-bomber buzzes the beach.

Image

Fig.2. The assault goes in. The book in the foreground leaves no doubt as to the where and the why of it all.

Landing Two 4 July 13

Posted in Uncategorized | Leave a comment